Driveways Southend provide imprinted concrete driveways across Southend-on-Sea and the surrounding area. We install reinforced, well-detailed pattern-imprinted surfaces in a wide choice of stone, slate, cobble, or brick effects, with blended colours and decorative borders. Our team at Driveways Southend manages design, excavation, sub-base preparation, reinforcement, control joints, and drainage so you get a long-lasting, low-maintenance finish with crisp edging and strong kerb appeal. Book a free survey and quote anywhere in Southend, Leigh-on-Sea, Westcliff, Rochford, Rayleigh, Benfleet and nearby Essex.
Imprinted concrete driveways are monolithic concrete slabs poured over a compacted MOT Type 1 base, coloured with surface hardener and release, then stamped with textured mats to replicate natural materials. Falls, edge restraints, and drainage (e.g. channel drains or soakaways) are set during installation to manage runoff because the surface itself is non-permeable; shrinkage joints are cut to control cracking. After curing, the slab is sealed—anti-slip additives can be used—to protect colour and make cleaning simple. The result is a seamless, weed-free driveway with high load capacity for daily parking, extensive design flexibility in patterns and borders, and straightforward upkeep: occasional washing and resealing every 2–4 years keeps the finish looking sharp, with localised scuffs or stains usually resolved by spot cleaning or touch-in and reseal.
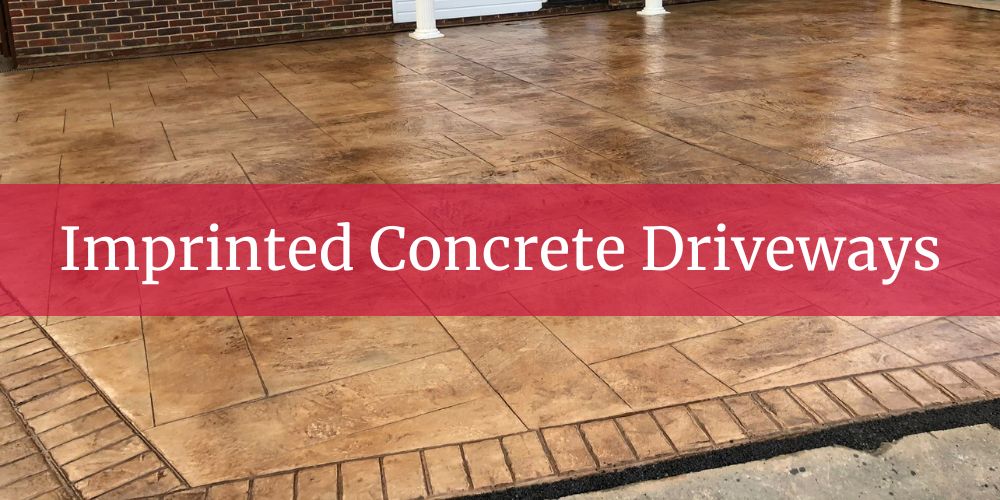
What Are Imprinted Concrete Driveways?
Imprinted concrete driveways, also called pattern-imprinted or stamped concrete, are monolithic slabs poured in place and textured to look like stone, slate, cobble or brick. In Southend-on-Sea they’re typically laid over a compacted MOT Type 1 foundation, with steel mesh or fibre reinforcement specified for durability on coastal soils. During installation, colour hardener and release are applied and textured mats are pressed into the surface to create realistic patterns and joints. Because imprinted concrete is non-permeable, we set precise falls and integrate channel drains or a soakaway to meet SuDS requirements and manage heavy local rainfall. Control and expansion joints are cut and sealed to manage shrinkage and help prevent random cracking around parking and turning areas. The finished surface is sealed to lock in colour, resist staining and improve slip resistance; anti-slip additives are recommended for steps, slopes and seaside weather. Maintenance is straightforward with occasional washing, prompt oil-spill cleanups and resealing roughly every 2–4 years depending on exposure and use. When damage occurs, local patches and a fresh seal can often restore uniform colour and sheen, delivering a long-lasting, weed-free driveway with strong kerb appeal for Southend homes.
Have a question about an upcoming project?
What Are The Different Types Of Imprinted Concrete Driveways?
Imprinted concrete driveways come in a few main types defined by pattern style, colouring system, surface finish, and construction method. Pattern families include cobblestone/setts, ashlar slate/flagstone, herringbone or running-bond brick, random stone, and wood-plank textures. Colouring is either integral pigment mixed into the concrete or a dry-shake colour hardener with antique release for two-tone depth. Builds range from full-depth reinforced slabs for driveways to polymer-modified overlays on sound bases, all sealed in matte, satin, or gloss with optional anti-slip.
- Pattern styles: cobble/setts, ashlar slate/flagstone, brick, random stone, wood plank
- Colouring systems: integral pigment or dry-shake hardener + release
- Finishes: matte, satin, or gloss sealer; optional anti-slip
- Build variants: full-depth reinforced slab or thin overlay
1. Pattern Styles: Cobble/Setts, Ashlar Slate/Flagstone, Brick, Random Stone, Wood Plank
Pattern-imprinted concrete can mimic traditional cobbles and setts for a heritage look, or ashlar slate and flagstone for a contemporary, large-format feel with fewer joint lines. Brick patterns (herringbone or running bond) create strong directional lines that suit entrances and parking bays, and they visually widen narrow drives when oriented across the vehicle path. Random stone breaks up large areas and disguises minor wear, while wood-plank textures deliver a deck-like aesthetic without timber maintenance, cupping, or rot. Deeper relief patterns generally offer more traction but can hold a little more surface water; finer textures ride smoother near garage thresholds. Borders, soldier courses, and feature bands (often in a contrasting colour) help frame the field pattern, control cuts at edges, and reduce visual “creep” across the driveway.
2. Colouring Systems: Integral Pigment or Dry-Shake Hardener + Release
Integral pigment colours the entire slab for uniform tone and makes small chips less noticeable, but it does not increase surface hardness. Dry-shake colour hardener is broadcast and trowelled into the surface during finishing, creating a denser, more abrasion-resistant wearing layer with richer tones—ideal for turning areas and frequent parking. An antique release (powder or liquid) is applied before stamping to prevent mat adhesion and to create two-tone depth that highlights grout lines and texture highs and lows; excess is washed off prior to sealing. Many installers combine a base hardener colour with a subtle secondary antiquing shade for added realism, and borders can be coloured separately for emphasis. Whatever the system, a UV-stable sealer preserves colour, adds stain resistance, and should be refreshed periodically to maintain appearance and slip performance.
3. Finishes: Matte, Satin, or Gloss Sealer; Optional Anti-Slip
A matte sealer delivers a natural stone look and hides minor scuffs, tyre marks, and patch repairs better than higher sheens. Satin provides a balanced, soft sheen that lifts colour depth without appearing shiny, making it the most popular “all-rounder” for driveways. Gloss maximises colour richness and wet-look depth but can highlight surface marks and, without additives, may feel slick in the rain. Anti-slip can be added to any sheen using micronised polymers or fine quartz aggregates, targeted to slopes, entrances, and main walk paths. For longevity, clean and decontaminate before resealing, choose UV-stable products, and plan a maintenance cycle of roughly 2–4 years depending on exposure and traffic.
4. Build Variants: Full-Depth Reinforced Slab or Thin Overlay
Full-depth systems use a poured, reinforced concrete slab over a compacted sub-base, with fibre or mesh reinforcement and saw-cut control joints spaced appropriately to manage shrinkage and turning forces. This build offers the greatest load capacity and lifespan, accommodates recessed covers and drainage channels cleanly, and is ideal for new or fully reconstructed driveways. Thin overlays use a polymer-modified topping applied to sound, prepared substrates (existing concrete or asphalt), with primers for bond and a stamped finish at ~10–20 mm—best where structure is adequate but aesthetics need upgrading. Overlays require careful substrate assessment (movement, cracks, contamination) and joint reflection planning to avoid telegraphing. Both variants are non-permeable, so set precise falls and integrate channel drains or a soakaway to manage runoff and align with SuDS expectations.
What Are The Advantages Of Imprinted Concrete Driveways In Southend?
Imprinted concrete driveways provide a seamless, weed-free surface with a monolithic, reinforced slab that stands up to daily parking and tight turning. They offer rich design flexibility—stone, slate, cobble or brick effects with borders and colour hardeners—for premium kerb appeal across Southend property styles. Although non-permeable, drainage is simple to plan with set falls and integrated channel drains or a soakaway to handle coastal rainfall and align with SuDS intent. Maintenance is light—periodic washing and resealing every 2–4 years (with optional anti-slip additive)—for durable, stain-resistant performance and strong long-term value.
- Seamless, weed-free, high load capacity
- Custom patterns/colours and decorative borders
- Planned drainage: falls + channels/soakaway (SuDS-aware)
- Low maintenance; reseal every 2–4 years
- Optional anti-slip for wet/coastal areas
1. Seamless, Weed-Free, High Load Capacity
Imprinted concrete is a single monolithic slab, so there are no sand-filled joints for weeds, moss, or ants—ideal for low-maintenance driveways. Build it like a small road: excavate, add a separation geotextile if needed, then 150–200 mm MOT Type 1 compacted in layers; pour 100–125 mm concrete for cars (thicken to 150 mm at garage mouths/turning bays). Use mesh (e.g., A142 on spacers) or macro-synthetic fibres (≈3–5 kg/m³) for reinforcement, and target a durable mix (e.g., C30/37, low w/c, slump S2–S3 for crisp stamping). Set falls ~1:60–1:80 and integrate linear channels/soakaway to handle Southend’s coastal rainfall while keeping thresholds 150 mm below DPC; choose A4/316 stainless grates/fixings near sea air. Cut control joints within 24–48 hours at spacings of about 24–30× slab depth (often 2.4–3.0 m), hiding them on faux grout lines or border bands to preserve the pattern. Cure correctly (membrane or compatible cure-and-seal), keep vehicles off for 3–7 days, and avoid de-icing salts; with good edge detailing and jointing, the slab stays stable, quiet under tyres, and resilient to daily parking and tight turning.
2. Custom Patterns/Colours and Decorative Borders
Stamp sets cover cobble, ashlar slate, flagstone, brick, and wood-plank looks; pick scale to suit the plot (larger mats for open forecourts, tighter cobbles for small bays) and orient patterns to visually widen narrow drives or guide parking. Colour options include integral pigment (uniform tone, chip-friendly) or dry-shake colour hardener (≈3–5 kg/m²) for a tougher wearing face; pair with antique release (powder/liquid) to create realistic two-tone depth. Plan feature borders, soldier courses, double bands (100–200 mm), and step details to frame the field pattern; darker bands at thresholds disguise tyre tracking, while lighter tones lift the façade—use a sample panel to lock choices before the pour. Disguise control joints by aligning them with faux grout lines or border breaks; recessed covers can be textured to match and virtually disappear, and bullnosed treads/risers can be skinned for continuity on steps. Finish with a UV-stable sealer (matte/satin/gloss) and micronised anti-slip where needed; in Southend’s coastal climate, favour colours and textures that hide salt spray and specify corrosion-resistant trims for long-term appearance.
3. Planned Drainage: Falls + Channels/Soakaway (SuDS-Aware)
Because imprinted concrete is non-permeable, falls must be designed into the screed—aim for 1:60–1:80 (steeper near door thresholds, garages, or where wind-driven rain is common). Collect runoff with linear threshold channels at doors and linears or gullies elsewhere; specify load ratings sensibly (A15 for pedestrian thresholds, B125 where vehicles cross) and favour A4/316 stainless grilles in sea air. Where ground allows, discharge to a BRE 365–sized soakaway set ≥5 m from buildings; in clayey areas or high water tables, use a partial infiltration/tanked design with a controlled outfall to maintain SuDS intent. Include silt traps and easy-clean rodding points so debris from coastal winds and tree litter doesn’t clog systems. Keep finished surfaces ≥150 mm below DPC, or use a level-access threshold drain that preserves the DPC line while preventing splashback. Tie roof downpipes into the drainage plan (or a separate soakaway) rather than spilling onto the slab, and seal all service penetrations to stop water tracking.
4. Low Maintenance; Reseal Every 2–4 Years
Routine care is light: sweep grit/leaves, then low-pressure wash (fan tip, ~100–150 bar max, 300–400 mm standoff) to avoid scarring the sealer. Reseal every 2–4 years depending on exposure and traffic—clean/degrease, treat algae with a non-acid biocide, rinse thoroughly, allow to dry, then apply a UV-stable sealer (matte/satin/gloss) at the manufacturer’s coverage rate in thin coats; avoid trapping moisture which causes whitening. Choose solvent-acrylic for a classic look and easy future maintenance, or PU/MMA systems where higher chemical resistance is needed; test a small area first to confirm compatibility with the existing film. Signs you’re due a reseal include dull, chalky colour, increased porosity (rapid wet-out), and patchy sheen—don’t over-apply; two light coats beat one heavy coat. Spot issues (oil, tyre marks) are usually solved with targeted cleaners and a local spot-reseal, avoiding full-area work. Skip strong acids on the slab, limit de-icing salts, and never jet directly into control joints or channel drain edges.
5. Optional Anti-Slip for Wet/Coastal Areas
Boost wet grip by adding micronised polymer beads or fine mineral aggregate (e.g., 100–300 μm silica/bauxite) into the final sealer coat—broadcast light and back-roll, or use a pre-blended anti-slip sealer per data sheet. Expect a slight sheen reduction as texture increases; balance desired PTV ≥36 (wet) with cleanability, especially in shaded or wind-blown salt zones. Pattern choice helps too: slate, cobble, or tight-texture mats give more micro-profile than smooth flagstone or plank finishes, and orient textures across slopes/approaches for better footing. Prioritise anti-slip at ramps, steps, door thresholds, and garage aprons; re-top up during each reseal cycle to maintain performance. Keep algae and salt film at bay with periodic biocide washes—clean surface + fresh anti-slip topcoat = reliable traction all year in Southend’s coastal climate.